

When Naomi continues her spiel about coconuts and berates her blender for not not paying the rent.
Let’s just jump right in shall we?
Cutting the Coconut
This step is necessary because even without the shell, a raw coconut is still pretty hard. Imagine putting stones in your blender. Basically, your blender would never work again. Get a cutting board and a regular ol’ knife.
I don’t chop the coconut pieces, because that would take forever. Instead I sort of impale the piece with the knife and begin breaking it off into smaller pieces. This is the most tedious step, so get comfortable. Put a Spanish telenovela or some comforting music to keep you company.

Hopefully you did a better job than me at this.
After this part, I wash the coconut pieces by placing them through a strainer and letting bits of dirt rinse through the strainer. This isn’t strictly necessary, but I want the oil to be clean before I put it through the blender.
The next step is…
Blending The Coconut
Fill your blender halfway with coconut shards. Yes, only halfway. Too many shards will overwhelm the blender and you won’t enough coconut flavoring anyway. Any other pieces that don’t fit in the first blend will fit in the second blend.
Yes, there will be second blends. Many of them. So to repeat, only fit them roughly halfway. Then, fill the rest of the blender to the brim with water. The water will help extract the coconut fat from the shards.
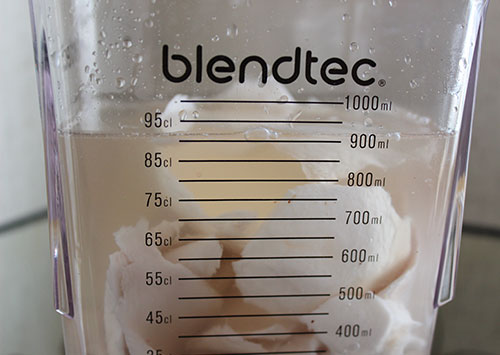
Now comes the easiest part! Put the blender at the highest speed for about 5 minutes. The fat and flavoring is extracted from the water. It should look something like this:

Here’s where you get your strainer. Then, you strain the coconut water and squeeze the shredded coconut, getting every last drop. After you squeeze the water out, the coconut shreds should now feel dry and grainy.
Next, you pour some water back into the dried coconut shreds and do the same process again. Luckily, the grunt work is done by your blender. If that hunk of metal isn’t going to pay bills, it better pull some work around here.
After you followed the same step above you should have a pile of of very dry, flavorless coconut shreds. There’s no point in saving them, because all the flavor has been extracted into the milk.
You just made freshly made coconut milk. Congrats!
Take the second batch of coconut shards and follow the same steps above. Yes, you must do it twice, or there was no point of doing it in the first place.
So, hopefully after this step you have a nice amount of creamy coconut milk. So how do you this creamy concoction into oil? This will be brought up…in the third installment.
I know I sound some like some Telenovela because I keep on saying “to be continued”. But guys. It would be so long if it wasn’t separated into sections. Instead of having one behemoth post stretching for 1,500 words or so, let’s have these bite sized posts instead.
If I keep this going, the final part will be posted this Thursday.

2 thoughts on “Homemade Coconut Oil Part 2”